
Metadata System (Tags & Notes)
Sharp Stock's tagging system breaks through the limitations of physical folder structures, providing you with a flexible, multi-dimensional resource organization solution.
1. Management Function Description
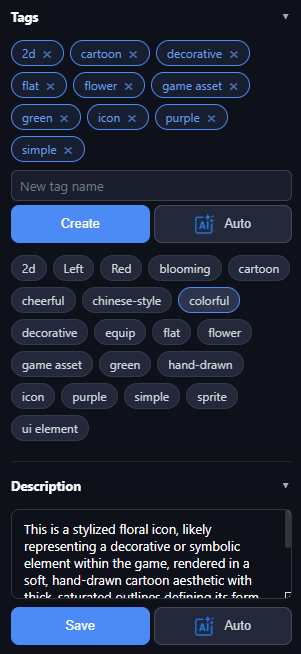
In the "Tags" and "Notes" blocks of the right detail panel, you can perform the following actions:
- Applied Tag Display: Displays all attributes currently associated with the asset as rounded tags. Click the
✕on the right to remove a tag instantly. - Custom Tag Creation: Type a new tag name into the input box and click "Create"; the system will automatically generate the tag and associate it with the current asset.
- AI Smart Generation: Click the "Auto" button with the blue AI icon. The system will call an intelligent model to analyze the asset content and automatically fill in description text or category tags for you.
- Global Tag Pool: The bottom of the panel displays all existing tags in the current asset library. Click a tag to quickly label the selected asset.
- Note Information Editing: Provides a multi-line text area for recording design purposes, modification logs, or creative notes for the asset.
2. Core Functional Features
- Automated Efficiency Improvement: Supports one-click AI tag and description generation for individual assets. For details, please refer to AI Tagging and AI Description.
- Batch Sync Labeling: Supports one-click addition of unified business classifications (e.g., "Q1 Campaign Resources") to resources from different directories in multi-select mode.
- Persistent Data Storage: All notes and tag data are stored in a local database. Even if you move physical assets within the software, their associated metadata will remain fully intact.
3. Operation Guide
- Manually Add Tags: Select target asset -> enter tag name in input box -> click "Create".
- Reuse Existing Tags: Click a target tag directly in the "Tag Pool" to complete labeling.
- Execute AI Analysis: Click the "Auto" button in the tag or note area. AI-generated descriptions will be written to the library automatically upon success; if you make manual secondary modifications, be sure to click the "Save" button to sync.
- Submit Notes: After completing text entry, click the "Save" button at the bottom to persist note information to the database.