Skip to content

Import & Export

Sharp Stock deeply integrates system drag-and-drop interactions, aiming to simplify the flow of assets between the asset library and external environments (such as File Explorer or professional design software), achieving efficient resource entry and distribution.

1. Asset Import Operations

Quickly complete asset entry by dragging files or folders from an external window directly into Sharp Stock. The system's handling depends on your drag-and-drop landing point:

Import Logic Description

Scenario 1: Drag to Main View Grid

  • External Files: Imported in Copy mode to the currently selected directory.
  • Existing Library Files: If dragged only within the main grid, the system will perform no action.
  • Mixed Import: The system only processes resource copies from outside the library; existing library resources remain unchanged.
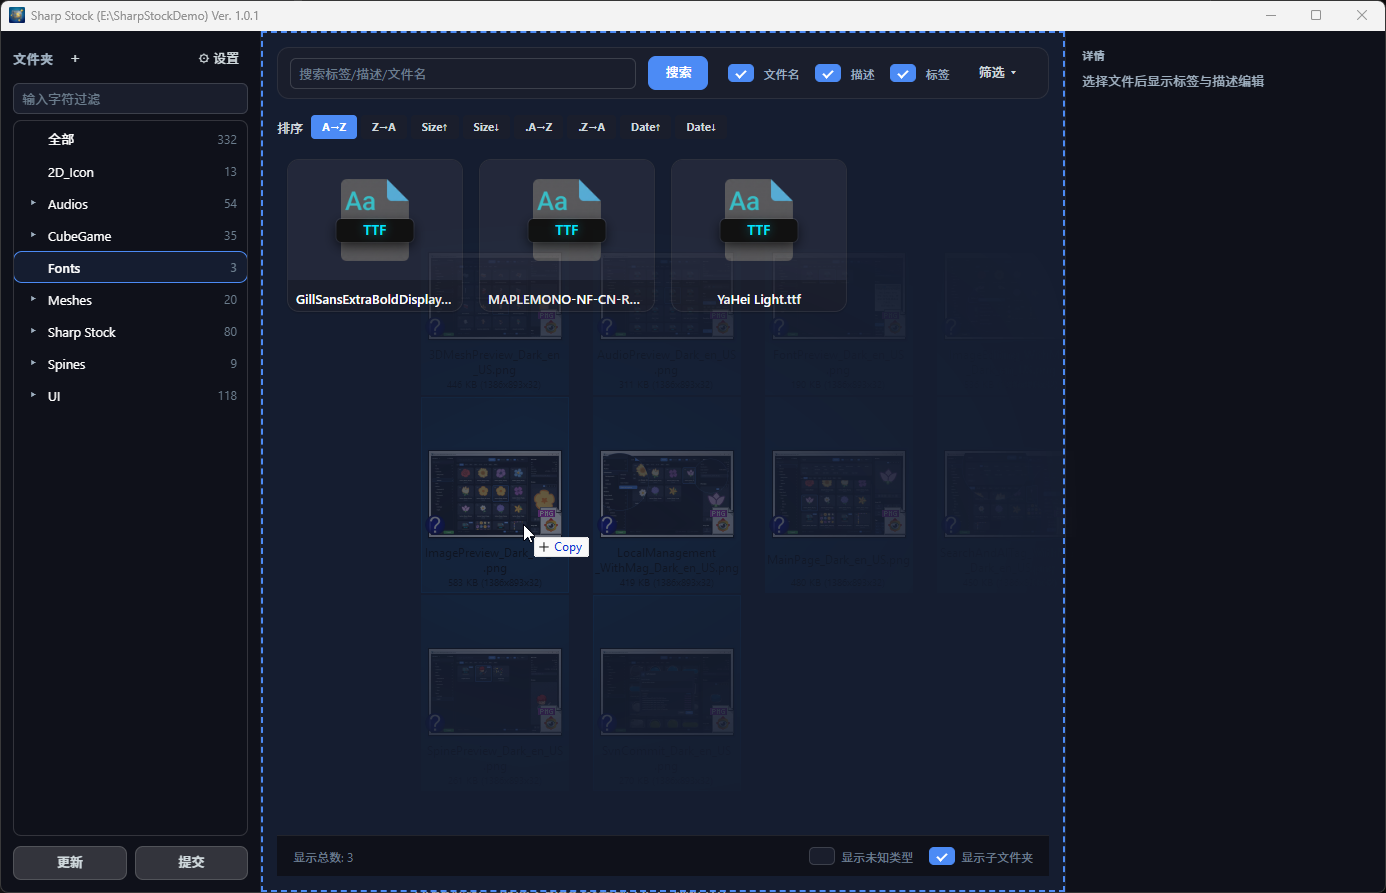
Dragging Images into Sharp Stock

Scenario 2: Drag to a Specific Folder in the Left Navigation Tree

  • External Files: Saved in Copy mode to the target directory.
  • Existing Library Files: A Move operation is performed; resources are redirected to the new directory, and no duplicate copies are created within the library.
  • Directory Node Adjustment: Used to adjust folder nesting relationships within the library.

Import Feedback

Once the import is complete, the main view grid will refresh instantly to display the new assets. The display order will be affected by the current global sorting method.

Paste Clipboard Images

If you have copied an image in an external tool (such as a web browser, screenshot tool, or chat client), you can directly press the shortcut key Ctrl+V (Windows) / Cmd+V (macOS) in the Sharp Stock interface (when input fields are not focused):

  • The system will pop up a rename input box with a default filename of pasted_image_YYYYMMDD_HHmmss.png.
  • You can paste while an asset is selected; there is no need to click an empty area or a folder first.
  • You can modify the filename as needed. Upon confirmation, the system will save the image as a PNG file and automatically import it into the currently selected folder in your asset library.

Cut, Copy, and Paste Inside the Library

Select one or more assets in the grid, then use the context menu or these shortcuts to organize them:

  • Copy: Ctrl+C on Windows or Cmd+C on macOS.
  • Cut: Ctrl+X on Windows or Cmd+X on macOS. Items waiting to be moved appear translucent.
  • Paste: Open the destination folder and press Ctrl+V on Windows or Cmd+V on macOS. You can also right-click the destination folder and choose Paste. If you right-click an asset instead, Paste uses the folder containing that asset as the destination.

Folders also support Cut, Copy, and Paste from their context menu. A folder cannot be pasted into itself or one of its subfolders. For duplicate names, choose Replace, Keep Both, or Skip; Keep Both adds an incrementing number suffix. Copying preserves asset descriptions and tags, while cutting moves the original items.

When subfolder contents are visible and you select assets from both the current folder and its subfolders, Paste preserves their structure relative to the folder you were browsing. For example, copying hero.png and enemies/boss.png from characters into backup creates backup/hero.png and backup/enemies/boss.png instead of flattening both files into one folder.

After a paste completes, Sharp Stock automatically selects every asset added or moved by that operation and scrolls the asset grid to the first visible pasted result, making it easy to review the new content and continue with batch tagging, moving, or deleting. Pasting ordinary assets keeps the view on the destination folder. Pasting an entire folder navigates to the new folder root and selects all assets pasted inside it without automatically entering one of its subfolders.

Choosing Replace for folders merges them: matching items from the source replace their target counterparts, while target-only items remain in place. Cut items marked Skip stay at their original location and can be pasted into another folder later.

When copying assets, existing technical information, descriptions, tags, and thumbnails are copied to the destination without analyzing the unchanged file again. When cutting assets, this data moves with them. This applies to images, audio, video, fonts, atlases, 3D, and Spine assets. If the source thumbnail is missing, Sharp Stock attempts to generate one for image assets after the paste completes.

When you copy an asset and paste it directly into its original folder, Sharp Stock automatically creates a numbered copy, such as hero_1.png, without showing the duplicate-name conflict dialog.

If you cut assets or folders and paste them back into their original parent folder, Sharp Stock reports that the source and destination are the same, leaves the files unchanged, and clears their pending cut state.

NOTE

Copy operations in Sharp Stock Lite and Sharp Stock Demo count toward the 100-asset limit. Cutting only changes an item's location and does not add assets.


2. Asset Export Operations

Select one or more assets in the grid view and drag them out of the Sharp Stock window to a target location to complete distribution.

Common Export Targets

  • System Directories: Export to File Explorer or the desktop.
  • Professional Tools: Drag directly into Photoshop, Unity, Unreal Engine, or Cocos Creator.
  • Collaboration Platforms: Drag directly into Lark, DingTalk, or WeChat Work chat windows as attachments.

NOTE

For assets like Spine that contain associated files, the system handles all related supporting files during export.


3. Core Supported File Types

CategoryCommon FormatsDescription
ImagesPNG, JPG, WebPAutomatically generates high-definition thumbnails and parses resolution.
Spine.skel, .json, .atlasAutomatically associates description files with texture atlases.
MultimediaWAV, MP3, OGG, WebMCan be auditioned or viewed directly within the software after import.
3D ModelsFBX, GLB, GLTFSupports 360-degree interactive previews.
FoldersSupports batch import of entire directory structures.

4. Important Notes

  • In-Library Reorganization: To adjust the storage location of resources already in the library, always drag them to the target folder in the left navigation tree to ensure database synchronization.
  • Standardized Naming: We recommend using legal naming conventions before importing. If unsupported illegal characters are detected, the software will attempt normalization.

5. Import Conflict Resolution Mechanism

When importing assets that share file names with resources already existing in the target folder, Sharp Stock will intercept the operation and present a Name Conflict Resolution Modal.

Resolution Options

  • Replace / Overwrite: Replaces the existing file in the library with the newly imported asset (not available for type blockers such as file vs folder collisions).
  • Keep Both / Rename: Keeps the original file and automatically renames the newly imported asset with an incrementing suffix (e.g., character.png will be saved as character_1.png. If _1 already exists, it will try _2, and so on).
  • Skip: Cancels importing the conflicting asset, leaving the existing file unchanged.

Single vs. Batch Conflict Resolution

  • Standardized File List Layout: All confirmation and conflict resolution dialogs in Sharp Stock follow a unified UI design. File names, target folders, and asset link paths are separated from paragraph descriptions and rendered in a dedicated "Conflicting Files" or "Target File" scrollable list area.
  • Single Conflict Mode: When only 1 conflicting asset is detected, the modal presents three direct action buttons ("Replace / Overwrite", "Keep Both / Rename", and "Skip"). A single click on any button immediately resolves the conflict and completes the import.
  • Batch Conflict Mode: When 2 or more conflicting assets are detected, a conflict resolution list is displayed:
    • Default State: Conflict items are unselected by default, and the bottom "Confirm" button remains disabled until all items have selected resolutions.
    • Header Control Bar: Integrated into the list box header, the toolbar provides "Replace All", "Keep All", and "Skip All" buttons. Clicking a batch button applies the chosen action to all items at once and activates the "Confirm" button.
    • Individual Selection: You can also manually select a resolution rule for each conflicting file. Once every item has a selected action, the "Confirm" button becomes enabled to execute the import.

NOTE

Image Compare (Tinify & AI Matting) Save All Conflicts: When clicking [Save All] in the old-vs-new image compare modal (after Tinify compression or AI matting), Sharp Stock automatically prechecks whether any target output file (e.g. hero.tinified.png or hero.transparent.png) already exists in the library. If target filename conflicts exist, this conflict resolution modal will pop up to let you choose overwrite, keep both (with auto-incremented suffix _1), or skip. Selecting [Replace All] directly overwrites the original source files without conflict prompt.

TIP

For large batch resource import tasks, we recommend executing [⚙ Settings] → [Maintenance & Optimization] → [Deep Scan] after the operation to ensure database index integrity.